Linux VPN Configuration
The networking components for Linux vary widely by Linux distribution and system hardware. We include instructions for Debian-based desktops and servers here. If you have trouble configuring WonderProxy VPNs on your non-Debian system, drop us a line!
Desktop (NetworkManager) Configuration
If your system uses NetworkManager to configure your internet connection, these instructions will help you set up a WonderProxy VPN.
-
Debian and Ubuntu do not include IPSec VPN functionality in their distributions by default, so you will need the NetworkManager plugin available on Launchpad for Ubuntu 14.04 (Trusty) and 16.04 (Xenial).
On 14.04:
On 16.04:sudo apt-add-repository ppa:seriy-pr/network-manager-l2tp sudo apt-get update sudo apt-get install network-manager-l2tp-gnomesudo add-apt-repository ppa:nm-l2tp/network-manager-l2tp sudo apt-get update sudo apt-get install network-manager-l2tp-gnome -
The previous step will install and start the
xl2tpddaemon. NetworkManager will handle that itself, so stop the daemon from running on system startup:sudo service xl2tpd stop sudo update-rc.d xl2tpd disable -
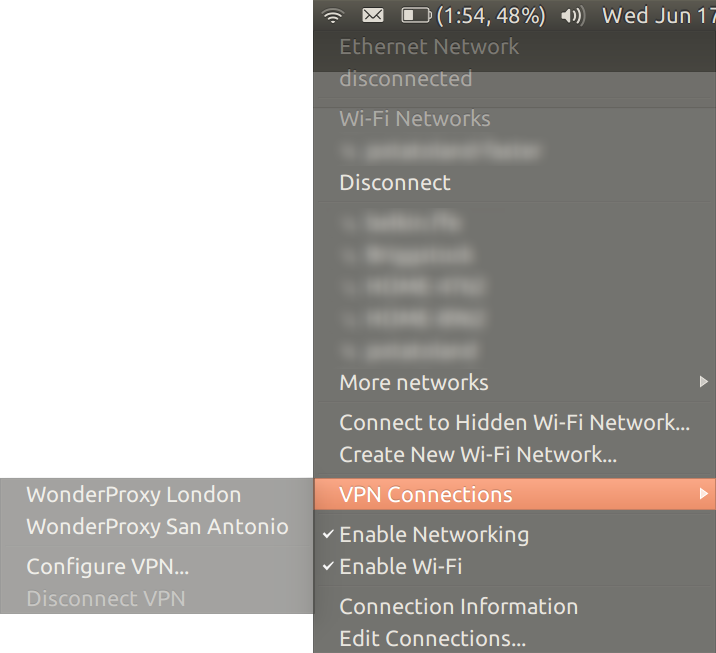
From the NetworkManager applet, navigate to the VPN Connections menu and choose Configure VPN...
-
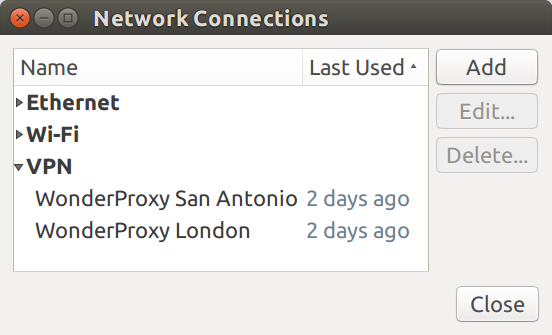
In the Network Connections window that opens, click the Add button
-
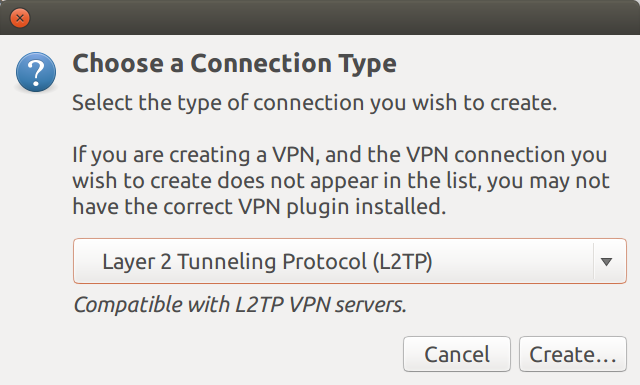
In the Choose a Connection Type window, select the Layer 2 Tunneling Protocol option and click the Create button
-
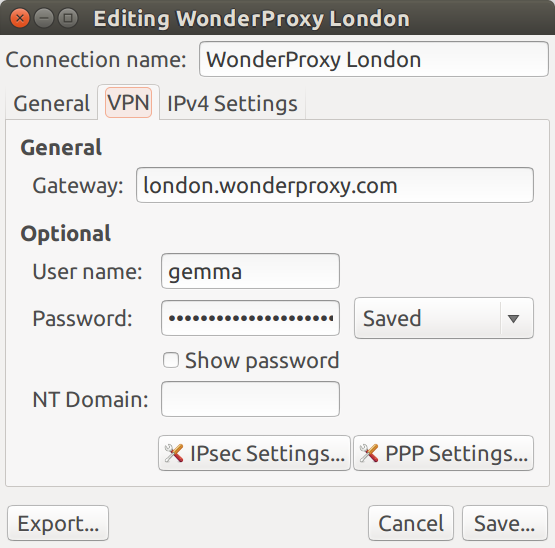
Configure the VPN connection as follows:
- Enter any name that makes sense to you in the Connection name field
-
In the Gateway field, enter the VPN
server you will use (for example,
london.wonderproxy.comfor our London server) - Enter your WonderProxy username and proxy token in the User name and Password fields
-
Click the IPSec settings... button
- Check the box for Enable IPSec tunnel to L2TP host
-
Leave Group Name as is (it may
be pre-populated with
GroupVPN, or empty) -
Enter
(you must be logged in as a proxy user to view the shared secret)in the Pre-shared key field - Click OK to continue

-
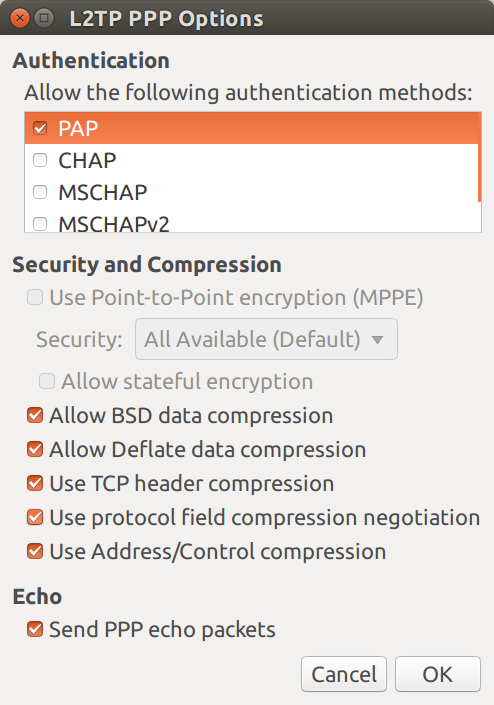
Click the PPP Settings... button
- In the Authentication list box, make sure that only PAP is selected
- Click OK to continue
- Click Save... to save the connection
-
Restart IPSec to load your changes:
On 14.04:
sudo service ipsec restartOn 16.04:
sudo ipsec restart -
Restart NetworkManager to load your changes. Note that restarting will temporarily disconnect your internet connection:
sudo service NetworkManager restart
You may now connect to your new VPN through the NetworkManager menu.
Server (Manual) Configuration
These instructions mirror the setup we have on our servers. The file locations below are correct for Debian (and variants like Ubuntu), but should be similar for other distributions.
-
First you'll need to install OpenSwan, xl2tpd, and ppp:
apt-get install openswan xl2tpd ppp -
Next add the line below to
/etc/ipsec.secrets: PSK "(you must be logged in as a proxy user to view the shared secret)" -
If you're only connecting to our VPNs then you can take our
ipsec.conf. Otherwise you may copy the appropriate connection definition from ours; the connections are all the same except for the hostname. -
Now restart openswan so it finds the new connection definitions:
/etc/init.d/ipsec restart -
At this point you should be able to establish an IPsec connection to one of our machines:
ipsec auto --up london
104 "london" #1: STATE_MAIN_I1: initiate
003 "london" #1: ignoring unknown Vendor ID payload [4f45557d6068416e77737478]
003 "london" #1: received Vendor ID payload [Dead Peer Detection]
003 "london" #1: received Vendor ID payload [RFC 3947] method set to=109
106 "london" #1: STATE_MAIN_I2: sent MI2, expecting MR2
003 "london" #1: NAT-Traversal: Result using RFC 3947 (NAT-Traversal): i am NATed
108 "london" #1: STATE_MAIN_I3: sent MI3, expecting MR3
003 "london" #1: received Vendor ID payload [CAN-IKEv2]
004 "london" #1: STATE_MAIN_I4: ISAKMP SA established ...
117 "london" #2: STATE_QUICK_I1: initiate
004 "london" #2: STATE_QUICK_I2: sent QI2, IPsec SA established transport mode...
For additional information, you can use IPSec's diagnostic tool:
ipsec verify. Note that you may safely ignore any failure messages aboutsend_redirectsoraccept_redirects. -
The next step is to tell xl2tpd about your connections. Again you can grab our
xl2tpd.confor copy certain sections of it. If you use our file, make sure you change thename = statsline toname = your-wonderproxy-username. Then restart xl2tpd:/etc/init.d/xl2tpd restart -
Next we need to provide ppp with the password used to authenticate your user. The
/etc/ppp/pap-secretsfile contains the information defined as follow:username hostname "proxy token"If you're only connecting to our machines you may replace hostname with
*:username * "proxy token" -
Next grab the ppp options file here and place it in
/etc/ppp. The filename should match the filename specified inxl2tpd.conf. For example, if you setting up a connection to our London server, the filename should beoptions.l2tpd.client.london.Assuming you've left your IPsec connection active from above you should now be able to activate your l2tp/ppp connection by running:
echo "c connection" > /var/run/xl2tpd/l2tp-controlwhere
connectionis the name of the connection inxl2tpd.conf. If you are using ourxl2tpd.conf,connectionwill be the name of the server. For example, to activate a connection tolondon.wonderproxy.com, you would replaceconnectionwithLondon:echo "c London" > /var/run/xl2tpd/l2tp-controlAfter a few seconds a
ppp#interface should appear inifconfig(likely ppp0) and you should be able to ping 10.42.96.1. Congratulations, you're connected! -
The last step is to route your traffic over the tunnel. To show your current routing table you can run:
ip routeThe first route you need to add is one to our proxy server via your current default interface otherwise your connection will disconnect.
ip route add <VPN IP> via <gateway> # the gateway will be present in your routing table aboveNext delete your current default route:
ip route del defaultAnd add the new one:
ip route add default via 10.42.96.1Now all your traffic is flowing through the tunnel.
-
To shut down the connection run:
echo "d hostname" > /var/run/xl2tpd/l2tp-controlAdd your old default route:
ip route add default via <gateway>Shut down the IPsec connection:
ipsec auto --down london