Iterating on an Interactive UI with ReactJS
While building the beta of observ.io over these past few months, Paul tasked me with creating an interactive UI where users could compare individual tests that they have run. The initial ask was:
We should help people diagnose problems by allowing them to view different test results and compare them with each other
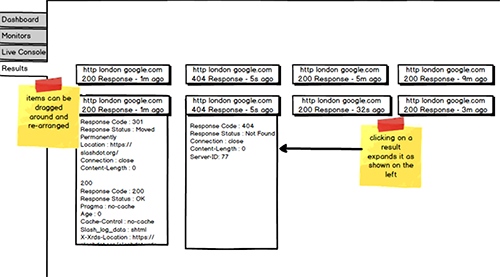
He provided a basic wireframe, with the idea that completed tests would be shown on screen as boxes a grid format. The user would be able to drag and drop tests to arrange them, and then expand the boxes to view the test results.
Here's what that initial wireframe looked like:
Looks simple enough, and yet starting a project from scratch is always daunting. My first question usually is: what tools exist already in the React community so that I don't have to re-invent the wheel?
In order to create a drag and drop grid where the boxes could be expanded, I needed to find a solution where the layout was dynamically/absolutely positioned so that the expansion of the boxes would dynamically alter the layout of the other boxes.
After testing out a few options, I decided to use a well-documented & maintained drag and drop library for React. This grid layout accepts an array of items, and assigns x & y values to each item. Every time a user drags an item, the x & y coordinates of all grid items are recalculated through the layoutChange() callback. Each item also has a height attribute, which through a unique identifying key, can be updated to update the height of the box - and thus the overall layout of the grid.
In this post, I'll talk about how the user experience and usability of this new observ.io feature progressed, but I'll also look at how my React code was updated throughout this process.
Version 1
In the first version of what we’re calling the ‘Comparison View’, I was to load all of the user’s jobs inside my fancy draggable react grid on initial load.
In react this looked something like:
componentDidMount() - Generate initial layout of grid with all available tests, e.g. looping through all of the tests and assigning them x & y values to create a 3 column grid
toggleBox() - When the user expands a box, this function makes an API call to lazy load in results for that specific job, it then adjusts the height of the box to the expanded height, and then finally updates the layout state to re-render the grid via the render() function
onLayoutChange() - When user drag & drops anything in the grid, this function makes sure that the layout state is updated the grid is rendered accordingly
Pictured above: The first version of the drag & drop layout
Pictured above: The drag & expand functionality
Having created this initial iteration, we realized a few things:
-
We hadn’t limited the amount of boxes on screen, so the amount of boxes started to overwhelm the drag & drop library once the user had created numerous console jobs.
-
In addition to basic performance, if there were 50+ boxes on the screen, it was It was difficult to locate the specific boxes you wanted to find in order to compare them
Aside from these initial concerns regarding usability, the initial prototype was a success in that an expandable drag & drop grid was feasible and fairly sturdy, while the logic was accessible and the library did not provide any foreseeable obstacles for further development.
Version 2
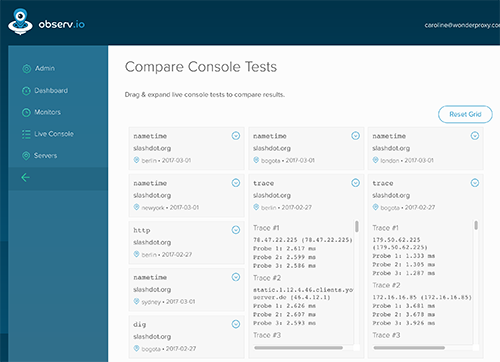
The second iteration was created fairly promptly to address the previous issues we noticed. Gemma proposed we could load selected jobs rather than all of the jobs as to not overwhelm the page, via a query string. In this new iteration of the comparison view page, the user would select specific console jobs that had been run, and proceed to view only those in the comparison view.
For our react component, the initial loading of items was tweaked in order to pull data from the query string. In react, this was an update to our componentDidMount method.
componentDidMount() - Generate initial layout of grid with the console jobs based on the query string jobs provided

Pictured above: A handy querystring to load in selected jobs, rather than all of the jobs the user has ever run
At this point, Paul had some inspiration as to how he envisioned this working in a more sophisticated manner so he proposed a new wireframe.
Version 3
In Paul's new vision for the comparison view, there’s a new distinct space where users can view/compare results. Below the workspace would be a grid of all of the tests the user has run, where the user can easily filter tests in order to locate exactly what test they’re looking for. Ideally this will allow for more control over the potentially lengthy lists of tests available on this page.
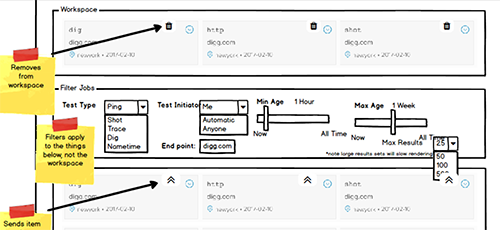
Pictured above: A new wireframe emerges, with filters and a workspace
Extending my existing original prototype once again, I had to separate my comparison view component into two distinct sections: the workspace, and the grid of tests with filters.
Our new componentDidMount method now still loads the selected jobs that the user has chosen, but now every other test in the user's history will show up below in the grid.
What was particularly tricky in this next iteration, was figuring out how to add a new grid item to our workspace, laterally. I had to calculate where the last box was on the screen according to our layout state, and then plop the new box either beside the last box, or on a new row if the row had already been filled up. This proved to be trickier than expected.
Pictured above: Adding a grid item to the workspace, laterally.
Key Learnings
Having wrapped up version three of this new feature page for Observ.io, there are the key things that I learned:
Going from simple to complex
Starting from a very simple prototype and expanding on it was a fun way to learn a new library and build on it in an iterative way.
Anticipate Performance Issues
Generating 1000 items in the DOM is going to be a bad time on prod if you've only tested with 10 items.
React is fun
and you should learn it.